Test and feedback extension

Earlier in October Microsoft announced General Availability for the Test and Feedback extension for Google Chrome (and yes, there is no Edge version yet). This extension was previously called Exploratory Testing Extension, if you already tried it before.

I have been using this extension with some customers since early versions, and sincerely after seen how it evolved I must send a lot of kudos to the team, it is a great way to share findings on bugs and tests but also for feedback. Basically this extension allow teams (and stakeholders) to record sessions in web applications which they can share the results with the rest of the teams in several work item types: as bugs, tasks of even tests cases with the steps from the exploration.

I found this is a great way for stakeholders who are not used to write long descriptions or feedback acceptance texts to give quick feedback and communicate unexpected behaviors quickly to developers. As well as it allow developers to receive quick and actionable feedback within VSTS and TFS directly.

As you can see in the next image, when we, after recording, choose to create a new Work Item, it stores as steps with automatic image captures, all the steps done during exploration:

image

It is remarkable also that you can add additional information like: notes, screenshots, and even video with voice recording !!! (and yes, my customers love especially this last two ones … it saves a lot of time from writing). Also it has a couple of modes of working:

  • Standalone: you can use it without even a connection to a TFS/VSTS and after the session it produces an HTML report of the session. At this moment I haven’t used this mode so much, as all of of my customers are in TFS or VSTS so I haven’t found this very useful for my scenarios.
  • Connected mode: you connect to a Team Project on TFS or VSTS for the session, everything gets recorded on the exploratory testing sessions for TFS, and also you can create bugs, tasks or test cases with data from the session. This is really the mode I have been using almost all of the time.

And how this works? well first install the Google Chrome extension, and then you will have this button: image on your Google Chrome toolbar, just click it, and select the mode for the first time (you can change it later):

image

Then just click on the play icon image and start recording, as there is already a very good documents on the Visual Studio ALM Blog, let me resume them for you:

  • General announcement and overview: General data about the extension and main announcement on GA.
  • Capture information as screenshots, video, notes, page load data and more: interesting to discover how to use the different type of information which you can capture in your sessions for adding them later in Work Items.
  • Artifact creation: How to create the different type of work items or reports (on standalone mode) after the sessions and including the additional information.
  • Team collaboration: Information about how to use in the two different modes and with different access levels to TFS and VSTS and how to consult the results afterwards in the form of reports, sessions or artifacts captured. To fully understand this one it is important to read the two previous ones. Specially interesting is how to use it with Stakeholders with limited access.

So go ahead, install the extension, and start sharing the findings between teams and Stakeholders, I’m sure you will like it as much as I do.

Sample VSTS Build and Release Management task for Yarn package manager

During this weekend I wanted to try the new package manager Facebook created: Yarn, one of it’s bigger claims is to be faster than normal npm, although it uses the same package repositories as npm. this is done, as far as I know, using improvements in transfer the files along with a local package cache, so you don’t have to go always to npm to restore a package you already restored previously for other project.

As locally it was everything working smoothly, I decided create a new build task for VSTS so I can use it in my builds. First point it is only based to be used with your own agents for several reasons: first it has a demand which requires yarn to be installed (hosted agents does not have it … yet …), second, as said previously it uses a local cache to be faster, so at this moment, it made no sense to me to prepare something to be used with hosted agents, remember hosted agents are created on-the-fly so unless you need to restore packages for  several projects per build (next scenario I will try to cover), Yarn will be not necessary (well I agree it also improves download speed, but …).

So, for this first version, I just looked at the code of the current npm task and modified it to use Yarn, it is pretty simple and straightforward. The code is in my github account: https://github.com/lfraile/YarnTask

Feel free to see it, modify it, play with it and install it, I will be reviewing it for some improvements.

PD: Just as I was writing this post, I noticed something I should have look before … There is already a Yarn task in the Marketplace, hehehe, as I mention in my talk about creating custom tasks: always look if there is something available before build it … so well .. my fault … but, still, I will continue trying to improve it.

Configure Work Item Field as team field in Team Foundation Server

Recently, working on a customer, due to the teams and project structure they have, and the reporting needs for this structure (a correct structure BTW), we came to a situation in which dividing the Teams by areas was not so useful, and didn’t helped us in our work item and reports strategy, as you probably already have observed, it is not so easy to create the reports per team with complex structures, as areas are tree views.

So I came up to this article, which helped in creating a Work Item field to define the teams, I found it very useful for this and other situations, being honest, I find this even more comfortable than using areas for this.

For what is coming in this blog post I assume you already have knowledge about how to divide the work between teams in the same Team Project and feel comfortable with TFS Work Items personalization’s. Also this article is entirely based on Team Foundation Server On Premises.

Basically the procedure (go to the article for the details) is:

  1. Define a Global List for your list of teams.
  2. Add a new field for Features, Epics (the article doesn’t mention this first two but we also added to them=, Product Backlog Items, Bugs, Tasks and Test Plans. At the end of the day, any Work Item type which can be used to work in backlogs. It is important to define the field with the same name in all Work Item Types, and also be sure to make this reportable as dimension if you plan to use it in Reporting.
  3. Specify this field to have values from the Teams Global List as allowed values.
  4. Use witadmin command line tool to export the process, and modify the process to specify the new field as the field defining the team the work item belongs to. (<TypeField refname=»MyCompany.Team» type=»Team» />).

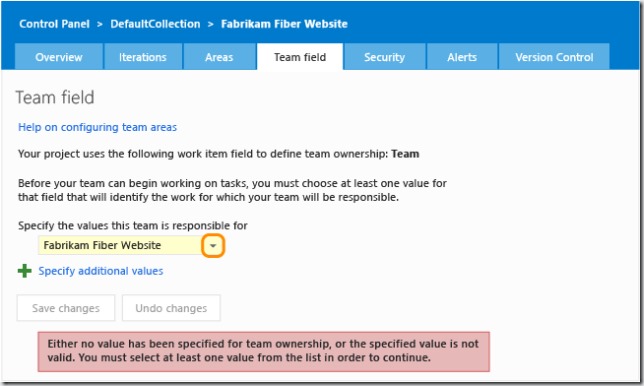
When you go to admin your Team Project (all of this is done at Project Level) you will see the possibility to define the value for the new field for each Team, so the backlogs and panels are filtered correctly.Make sure to specify this value for all of your teams, if you don’t do it, you will receive alerts about your team is not correctly configured. Also remember a particular team in TFS can own different values for this field, which is particularly useful for Product Owners views or management views.

IC686842

Also, there is another point in the article, which allows you to be able to specify the team you want the Work Item to belong during its creation from the Product Backlog view, something like the next image. But this configuration brought me a small problem, when someone from within a team, selects to create the Work Item for a different team, the backlog view produces an error as is it weren’t able to save the Work Item, so I disabled this configuration.

image

And as for final conclusion of this, well I haven’t been still a lot of time with this solution in production let’s say, but at this moment I find it very useful, as it allows me to improves some reports and Queries so I can clearly see the team a work Item belongs to, without any trick to truncate the area path or something to make the information easy to filter and more readable, specially in reports.

If you are going to need this or you will follow this article, please, test it thoroughly before going live, customizations in Work Items are always tricky, and specially in this level in which we are modifying the default behavior of TFS.

Also I tested it in a TFS “15” preview environment, and it also worked successfully as expected, so going forward to next version of TFS is expected to work.