

Creating sample data
During the application development stages, in most of the time, we are faced with the need to have at our disposal a set of test data to use in the different processes that are developing. A similar situation occurs if we are building an information system based on OLAP data cubes using SQL Server Analysis Services, because in these cases we will need also a large volume of data, to perform analysis simulations.
Let’s suppose we have to generate a database of population data, with a table containing data of individuals such as age, code region of residence, national origin, sex, registration date, etc. On the other hand, also need a series of catalog tables of countries, regions, and other values related to the fields in the table of individuals.
Among the full range of utilities, tricks, and more, which exist to carry out this task, in this article we will use Excel as a tool for generating the dummy data set for individuals that later we’ll dump in a SQL Server database, which could be used as a data source for the application or information system.
Creating data with Excel
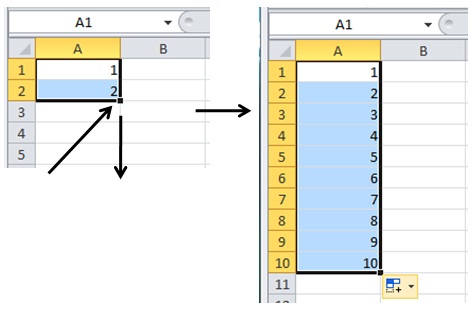
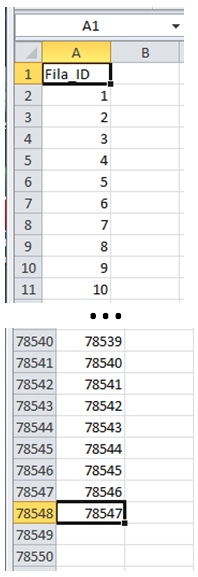
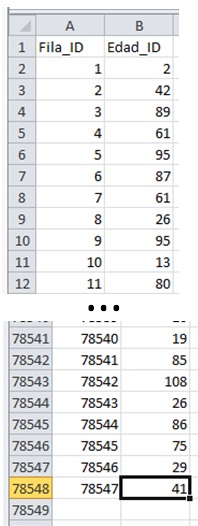
After starting Excel 2010 (earlier versions may also use), our first task will be to create a column with the values that will serve to identify the rows in the table. The simplest way to generate is to introduce a pair of consecutive numbers in individual cells in a column of the worksheet, select both cells and drag the fill handle to the last row for which we want to generate the numbers.
However, the generation of values using this technique can be somewhat cumbersome in the case that we must to produce a large number of rows and / or columns, so that for the creation of data for all columns of the sheet we’ll use a more flexible yet powerful solution: Excel macros.
Creating a Macro
To create a macro we will click on the View tab of the Excel ribbon, and within the Macros group we will click on the option of the same name, which opens the Macro dialog box, where we’ll write the macro name: CrearDatosPoblacion.
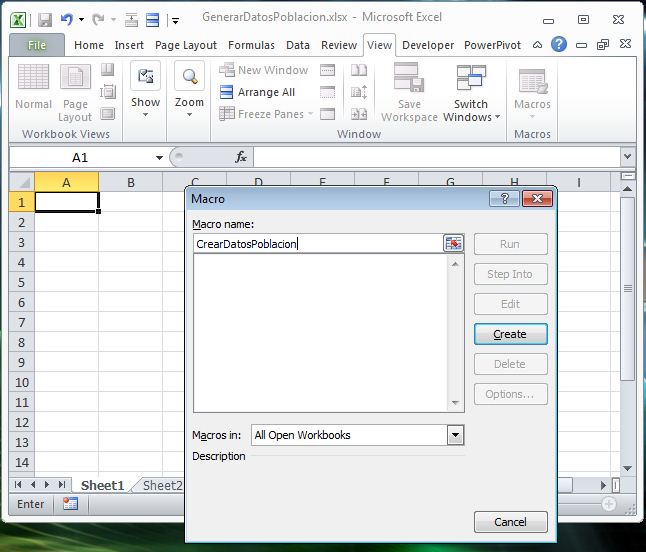
Clicking the Create button opens the Visual Basic for Applications (VBA) window editor, so that we can start writing the code of the macro.
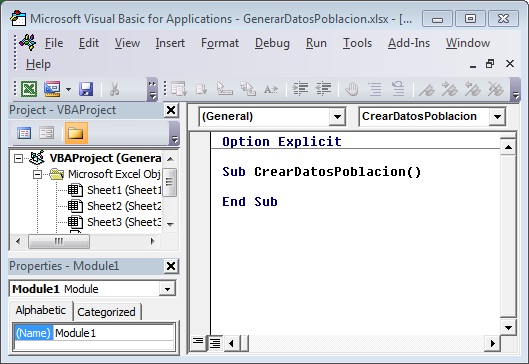
Within the procedure body CrearDatosPoblación, write the following block of code, where first, clean up the cells of the spreadsheet where we are currently positioned. Then ask the user to enter through an InputBox dialog box, the number of rows to generate. After inserting the column title, we will introduce the first two values that start the series, which generate using the method Selection.AutoFill.
Option Explicit

Sub CrearDatosPoblacion()

Dim nFilaDestino As Long
Dim sCeldaOrigen As String
Dim sCeldaDestino As String

'limpiar las celdas de la hoja de cálculo
Cells.Select
Selection.ClearContents

nFilaDestino = InputBox("Número de registros a generar")
nFilaDestino = nFilaDestino + 1

'columna fila_id
'---------------

'título de columna
Range("A1").Select
ActiveCell.FormulaR1C1 = "Fila_ID"

'valores iniciales de la serie a generar
Range("A2").Select
ActiveCell.FormulaR1C1 = "1"
Range("A3").Select
ActiveCell.FormulaR1C1 = "2"

'seleccionar rango de valores iniciales
Range("A2:A3").Select

'rellenar rango total de celdas
sCeldaOrigen = "A2"
sCeldaDestino = "A" & nFilaDestino
Selection.AutoFill Destination:=Range(sCeldaOrigen & ":" & sCeldaDestino), Type:=xlFillDefault

End Sub
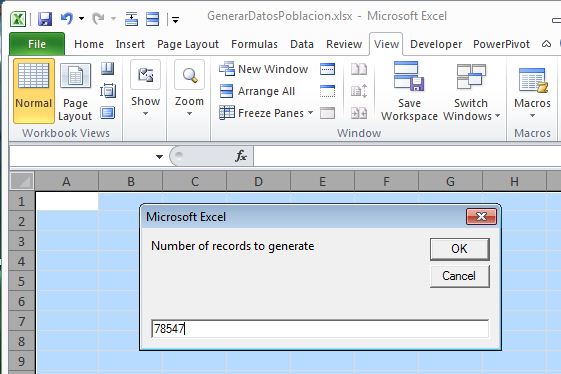
To run the macro will select the menu “Run | Run Sub / UserForm”, or press the key F5, filling the first column of the sheet with the number of values indicated in the InputBox.
Before continuing we’ll save our work in VBA or Excel, bearing in mind that we must do it in a file of type “Excel Macro-Enabled Workbook (.xlsm)”, what we will be notified by a dialog box in time to save. We will click No in that dialog and save our worksheet in a file named GenerarDatosPoblacion.xlsm.

Generating random data
The next column to create correspond to the age of individuals, in it, need to generate random values within a range of numbers, representing the maximum and minimum age that a person can have, for example between 0 and 120.
To create a random value between two numbers in a cell of Excel, we can use a formula with RANDBETWEEN function, that receives as parameter the above numbers, returning as a result the number generated.
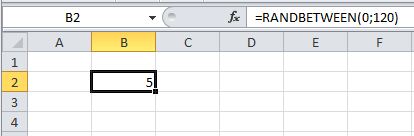
Moving this functionality to the macro that we developed, we will add to it the next block of code, which assign the formula expression RANDBETWEEN (0.120) to a cell in the second column. We will select that cell, and repeat the formula over a range of cells using the method ActiveCell.AutoFill.
'edad
'----
Range("B1").Select
ActiveCell.FormulaR1C1 = "Edad_ID"

sCeldaOrigen = "B2"
sCeldaDestino = "B" & nFilaDestino
Range(sCeldaOrigen).Select
ActiveCell.FormulaR1C1 = "=RANDBETWEEN(0,120)"
ActiveCell.AutoFill Destination:=Range(sCeldaOrigen & ":" & sCeldaDestino), Type:=xlFillDefault
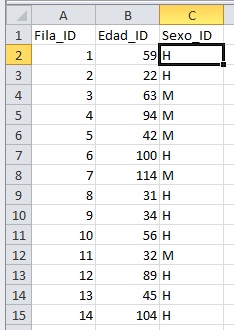
Running the macro again, we’ll get the new column with the age data.
Our next step is for the column of sex of individuals. Here we could have used numbers 1 and 2, also generated randomly, to identify male and female respectively, but let’s get a little this operation, using instead the letters H and M as values for the column. So the problem now is how to randomly generate these letters in the cells of the column, since RANDBETWEEN only receives and returns numerical results.
The solution is very simple, as it also involves using RANDBETWEEN function, but combining it with the decision expression IF. We will pass to RANDBETWEEN the numbers 1 and 2 as parameters, and according to the result obtained, IF return the letter H or M. Below is the code block for this column, we will add to the macro.
'sexo
'----
Range("C1").Select
ActiveCell.FormulaR1C1 = "Sexo_ID"

sCeldaOrigen = "C2"
sCeldaDestino = "C" & nFilaDestino
Range(sCeldaOrigen).Select
ActiveCell.FormulaR1C1 = "=IF(RANDBETWEEN(1,2)=1,""H"",""M"")"
ActiveCell.AutoFill Destination:=Range(sCeldaOrigen & ":" & sCeldaDestino), Type:=xlFillDefault
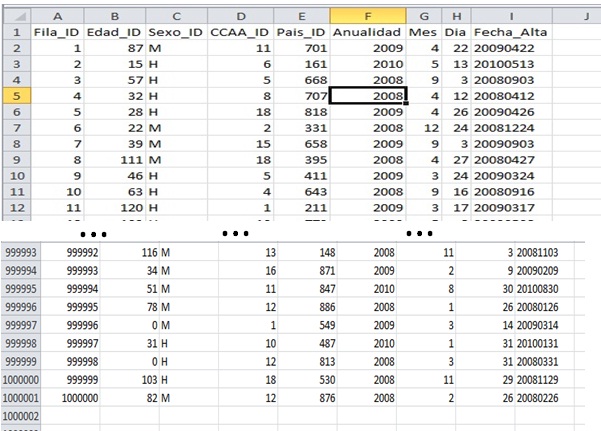
For the next two columns: code region of residence and country of origin code, we’ll follow the same mechanics as the column ages, although using different numerical ranges.
'ccaa
'----
Range("D1").Select
ActiveCell.FormulaR1C1 = "CCAA_ID"

sCeldaOrigen = "D2"
sCeldaDestino = "D" & nFilaDestino
Range(sCeldaOrigen).Select
ActiveCell.FormulaR1C1 = "=RANDBETWEEN(1,19)"
ActiveCell.AutoFill Destination:=Range(sCeldaOrigen & ":" & sCeldaDestino), Type:=xlFillDefault

'país
'----
Range("E1").Select
ActiveCell.FormulaR1C1 = "Pais_ID"

sCeldaOrigen = "E2"
sCeldaDestino = "E" & nFilaDestino
Range(sCeldaOrigen).Select
ActiveCell.FormulaR1C1 = "=RANDBETWEEN(4,894)"
ActiveCell.AutoFill Destination:=Range(sCeldaOrigen & ":" & sCeldaDestino), Type:=xlFillDefault

Our next step is to create the data of an alleged registration date of individuals in this population system, a task that will make in two phases. First, we create each part of the date in separate columns.
'elementos de fecha:
'===================
'año
'---
Range("F1").Select
ActiveCell.FormulaR1C1 = "Anualidad"

sCeldaOrigen = "F2"
sCeldaDestino = "F" & nFilaDestino
Range(sCeldaOrigen).Select
ActiveCell.FormulaR1C1 = "=RANDBETWEEN(2008,2010)"
ActiveCell.AutoFill Destination:=Range(sCeldaOrigen & ":" & sCeldaDestino), Type:=xlFillDefault

'mes
'---
Range("G1").Select
ActiveCell.FormulaR1C1 = "Mes"

sCeldaOrigen = "G2"
sCeldaDestino = "G" & nFilaDestino
Range(sCeldaOrigen).Select
ActiveCell.FormulaR1C1 = "=RANDBETWEEN(1,12)"
ActiveCell.AutoFill Destination:=Range(sCeldaOrigen & ":" & sCeldaDestino), Type:=xlFillDefault

'día
'---
Range("H1").Select
ActiveCell.FormulaR1C1 = "Dia"

sCeldaOrigen = "H2"
sCeldaDestino = "H" & nFilaDestino
Range(sCeldaOrigen).Select
ActiveCell.FormulaR1C1 = "=IF(RC[-1]=2, RANDBETWEEN(1,28), IF(OR(RC[-1]=4, RC[-1]=6, RC[-1]=9, RC[-1]=11), RANDBETWEEN(1,30), RANDBETWEEN(1,31)))"
ActiveCell.AutoFill Destination:=Range(sCeldaOrigen & ":" & sCeldaDestino), Type:=xlFillDefault
As we have seen, the day is the part of the date that requires further work, as we must be careful to avoid the generation, for example, of a day 31 if in the month column we have the value 2. We will solve this checking the month column in first place, and according this we’ll use a different range to generate the day. So that in the formula we’ll use several IF expressions combined with RANDBETWEEN functions.

In the second phase of this operation, we will create a final column in the spreadsheet with a date in a format understandable to SQL Server, as a result of the concatenation of the above columns: Anualidad, Mes and Dia.
It is necessary to take into account when composing the date in this way, we must add a zero to the month and day when these values are only one digit.
'componer fecha
'--------------
Range("I1").Select
ActiveCell.FormulaR1C1 = "Fecha_Alta"

sCeldaOrigen = "I2"
sCeldaDestino = "I" & nFilaDestino
Range(sCeldaOrigen).Select
ActiveCell.FormulaR1C1 = "=RC[-3] & IF(LEN(RC[-2])=1,""0"" & RC[-2],RC[-2]) & " & _
  "IF(LEN(RC[-1])=1,""0"" & RC[-1],RC[-1]) "

ActiveCell.AutoFill Destination:=Range(sCeldaOrigen & ":" & sCeldaDestino), Type:=xlFillDefault
When we rerun the macro, we’ll get the correctly formatted date in the last column. This time also establish the number of records to generate in a million, that way we will test the data creation power of our process.
To complete operations in Excel we’ll save the file as «Excel Workbook (*.xlsx)». Dialog box appears again warning that we couldn’t save macros in a .xlsx file, which we’ll reply by clicking Yes.
At this point we conclude the first part of the article, in the second installment will explain how to transfer the data just generated to SQL Server.
Regards,


anonymous
After data generation in Excel explained in the first part of the article, in this second installment
anonymous
This article addresses the challenge of develop a process to create a database with demographic information