Automate the UI testing of your app with Xamarin.UITest for Xamarin.Forms – A practical implementation
Introduction
Testing your apps must be a go-to if you plan to ship quality applications. You can unit-test your code for flaws in the logic side of the solution. That kind of tests are extended, and there is plenty of frameworks you can use. In essence, unit tests are more coupled to the language, but UI Tests are platform independent.
Some scenarios you can find mobile UI tests useful:
- Verify bug regressions
- Prove that a bug has been resolved
- Check app UI behaviour in different screen sizes / OS versions
- Automate app navigation for screenshots
- Check for validations
Xamarin.UITest is an automation library that can be used as a testing framework to create UI acceptance tests. It’s based on the NUnit testing framework. In the case you’re using it in Xamarin (this is the use case we’ll cover in this article), tests are written in C#. Therefore, this framework is also available for Java/Objective-C/Swift written projects.
This framework, at some extent, shares a goal with the Xamarin.Forms brother project: you can write UI test code for one platform, and run the test on many supported platforms. Today, we’ll focus on a practical approach: a guide on how to write (and run) UI tests for a Xamarin.Forms project. In this example, we’ll use the SmartHotel 360 reference app, using its Android and iOS flavors.
Implement it in your own project
To start, you need to create an UI Test project. Next, add to it the following NuGet packages:
- Xamarin.UITest
- NUnit 3
- NUnitTestAdapter3
Page helpers
In this project, we’ve decided to follow the concept of “page helpers”. Basically, it abstracts at level page the interactions you can get with a certain page. This level of abstractions aims for a cleaner codebase, because when you’re writing the real test, you use the methods you’ve previously defined on the page. For example, in the Login Page, we’ve set the interactions “Enter credentials” and “Sign in”. Here is the code:
public LogInPage EnterCredentials(string username, string password)
{
    App.WaitForElement(emailField);
    App.Tap(emailField);
    App.EnterText(username);
    App.DismissKeyboard();

    App.Tap(passwordField);
    App.EnterText(password);
    App.DismissKeyboard();

    App.Screenshot("Credentials Entered");

    return this;
}

public void SignIn()
{
    App.Tap(signInButton);
}
As you can see, this avoids going to “control level” when you’re writing the actual tests. So, for a successful sign-in test, you can write a test as simple as:
[Test]
public void SuccessSignInTest()
{
[…]
    new LogInPage()
    .EnterCredentials(TestSettings.TestUsername, TestSettings.TestPassword)
    .SignIn();

    new HomePage();
[…]
}
We were creating a helper page when needed. Another advantage of following this method is to concentrate the coupling with the actual UI in only one point of your code. Nevertheless, it’s a no-brainer that UI code and UI test code must be coupled to a certain extent.
A handy tool: REPL console
To create tests, you need to script step-by-step the interaction with the view hierarchy of the app (e.g. write this on that entry, and then push that button, etc…). In order to identify the elements on the visual tree, you can use the identifier of the image as a selector. Optionally, you can set an AutomationID. In that case, this will serve as an identifier of the view element, but only for automation purposes. Alternatively, you can do LINQ-like queries by different attributes: E.g by class, by enabled state…
You can view a freeze frame of your app’s view hierarchy with the REPL tool. Just write ‘app.Repl()’ on the point of your test that you want to debug the views, and a console window will open to you. From it, you can make live queries, see a live tree (with the tree command), make a view flash in order to identify it, and many more. Please read the docs for more info.

Xamarin.UITest REPL Console (click to go fullscreen)
Platform-specific fine tune
As we said previously, write tests at Xamarin.Forms / Xamarin.UITest level makes this test instantly available to supported platforms, and tests are shared between them. In this case, we’re using Android and iOS, and, although the test code is the same, you can establish different set-ups for different platforms. For example, the way to install the app to test.
if (Platform == Platform.Android)
{
    app = ConfigureApp
        .Android
        .WaitTimes(new WaitTimes())
        // Used to run a .apk file:
        .ApkFile("../../../SmartHotel.Clients/SmartHotel.Clients.Android/bin/UI Test/com.microsoft.smarthotel.apk")
        .StartApp();
}

if (Platform == Platform.iOS)
{
     app = ConfigureApp
         .iOS
         .WaitTimes(new WaitTimes())
         // Used to run a .app file on an ios simulator:
         //.AppBundle("path/to/file.app")
         // Used to run a .ipa file on a physical ios device:
         .InstalledApp("com.microsoft.SmartHotel360-df")
         .StartApp();
}
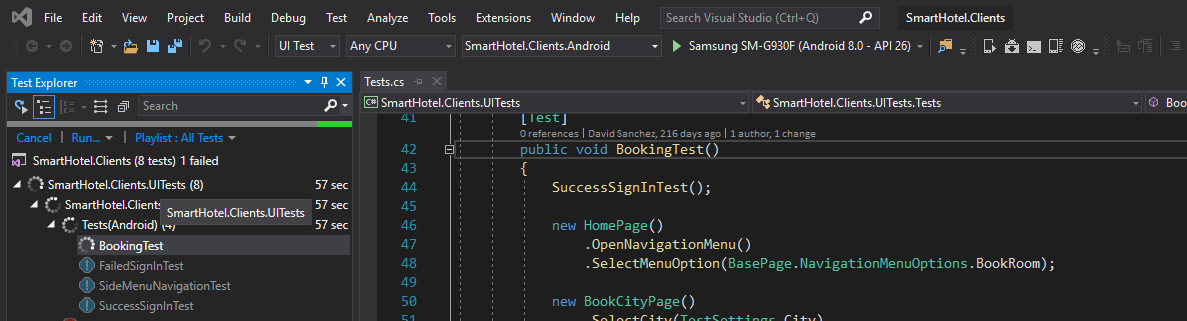
Run the actual tests, and see the results
Once we have written all tests, it’s time to run them! Go to Visual Studio 2019 -> Test -> Windows -> Text Explorer . It should be the same on Visual Studio 2017 (and in VS for macOS), and tests must run just equally fine. This time, we’re running it in a physical Android device, mirrored onto our desktop. If you don’t have a device at hand, you can perfectly use an emulator. By the way, you can establish when to save a screenshot with the App.Screenshot("your comment") method. Seems like magic the first time that you see it running 😃
Tests running on VS2019 Text Explorer, on a physical device (click to go fullscreen)
Conclusion
Et voilà! You’ve just discovered that creating UI Tests shared between different platforms is easy as pie. In our own experience, we find them easy to implement, and at the same time, it gives value to the stability and the continuity of the project. Joining this tests with a continuous integration environment, we have a history of UI changes, and hopefully we’re able to spot the commit that introduced (unwanted or not) modifications in our user interface. Give it a try!
BONUS: Xamarin Test Cloud
Xamarin Test Cloud is a service that Microsoft provides consisting on a batch of phones that they put at your disposition, enabling you to run the tests in their phones. This is especially neat, because you, as a developer, can access to a very broad selection of devices to test your apps, without having to have the devices physically with you. They are adding more recent models constantly.
It’s tightly integrated onto Visual Studio App Center. From this service, you can easily create your app, choose a device set, and run the UI tests with the AppCenter CLI app. To run the tests automatically with each build, we’ve set a post-build script on the repo.
References
SmartHotel360 Mobile Apps repo : https://github.com/microsoft/SmartHotel360-Mobile
Video reference:
André Leblanc
Will UI testing also work with SyncFusion UI controls ?
Francisco Javier Pulido Espina
please see your other comment
André Leblanc
Will it work also with third party UI contro like Telerik or SyncFusion.
Francisco Javier Pulido Espina
Yes, it must work! Those controls are built on top on standard UI components, so yes! 🙂