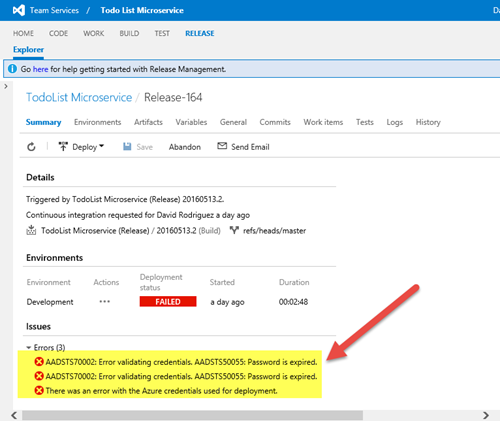
Today I was investigating an issue on Visual Studio Online Release Management, getting a deployment error related to the Azure credentials used for the deployment operation
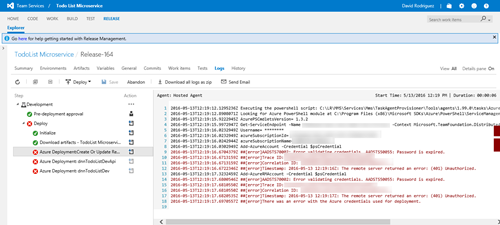
When going to the log details, the error happens on a resource manager task. The logs show that the password of the user account used to connect to Azure has expired.
And here comes something to highlight, because the configuration of the service connection between VS Online and Azure has evolved in the latest months, to support both Azure Classic and Resource Manager models. Also note that the tasks you can configure on Visual Studio Release Management can work with one of these models or both. Let me show with an example.
Configuring Azure service connection on VS Online Release Management
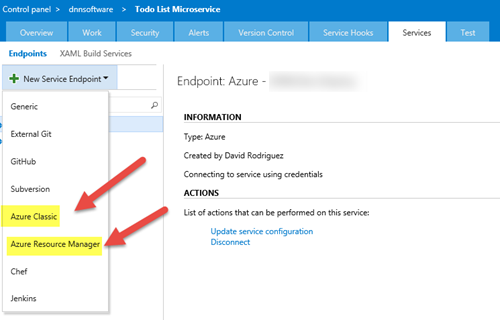
To setup the Azure connection on Release Management, you need to click on the “Manage Project”
Once there, go the “Services” tab and when clicking on the “New Service Endpoint” you will see two ways to connect to Azure: Azure Classic and the new Azure Resource Manager. A few months back there was an only option to support Classic and RM scenarios, but this changed later. The main difference now is the way each connection authenticates with Azure
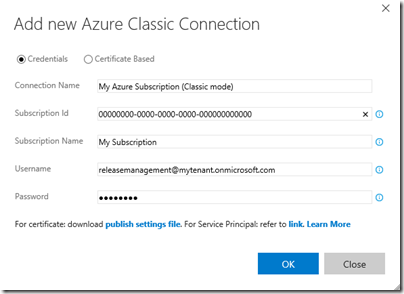
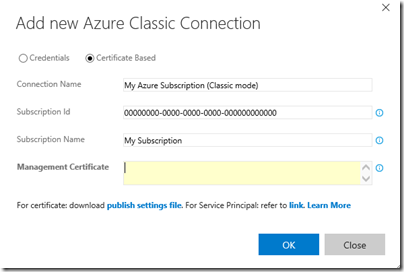
- Azure Classic.- with Azure Classic, the connection to the Azure services is done by using user credentials or a Management Certificate. Let’s say that this is the old way, but it is still needed because not all the services are yet using the new RM model and not all the Release Management tasks support the new Resource Manager model.
- Azure Resource Manager.- with Azure Resource Manager, instead of using user credentials or a management certificate, the connection is done by using service credentials. To create a service credential you can follow these post https://blogs.msdn.microsoft.com/visualstudioalm/2015/10/04/automating-azure-resource-group-deployment-using-a-service-principal-in-visual-studio-online-buildrelease-management/
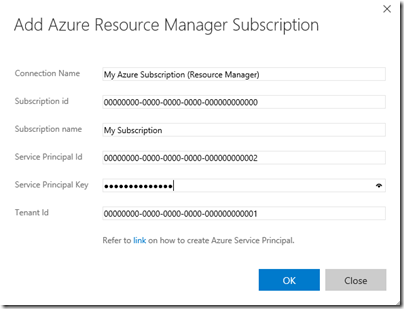
So a big difference here is the use of a service principal on Azure Resource Manager connections instead of using a user principal when using Azure Classic connections. This is important for our case, because the “Password is expired” error message we got refers to a user principal, not to a service principal where the “password” and “expiration” concepts are different.
Note that depending on the task used on Release Management, you can use one or other connection, or only the Classic connection. For example:
- when using a resource group deployment task, you can choose the connection type (Classic or RM) to then select the connection from the list of connections you configured above

- when using an Azure Web App Deployment, you can’t choose the connection type and only Classic connections can be used. Tip: you can use a webdeploy object on your Resource Manager template to avoid using this task (check https://blogs.technet.microsoft.com/georgewallace/2015/05/10/deploying-a-website-with-content-through-visual-studio-with-resource-groups/)

Fixing the “password is expired” issue
Once we understand these concepts, we have just to fix the password expiration issue. The solution has two steps:
- Change the password of the user principal and then update the Azure Classic connections with the new password. Note: You should use a long/very strong password for these user principals because of the second step; service principals come to play to stop using user principals in the future;
- To avoid this to happen again, change the password expiration policy for this account to don’t expire.
The first step can be easily done manually. For the second step, we need the help of Azure AD PowerShell module.
Install Azure AD PowerShell module
On this MSDN article you can find all the information related to managing Azure AD via PowerShell: https://msdn.microsoft.com/en-us/library/jj151815.aspx The Azure AD module is supported on the following Windows operating systems with the default version of Microsoft .NET Framework and Windows PowerShell: Windows 8.1, Windows 8, Windows 7, Windows Server 2012 R2, Windows Server 2012, or Windows Server 2008 R2. You need to install two utilities:
- First install the Microsoft Online Services Sign-In Assistant for IT Professionals RTW from the Microsoft Download Center.
- Then install the Azure Active Directory Module for Windows PowerShell (64-bit version), and click Run to run the installer package.
Connecting to Azure AD
Once you have installed both utilities, to start using all the Azure AD cmdlets just open a PowerShell command prompt.
$msolcred = get-credential
connect-msolservice -credential $msolcred
Obviously you need to introduce admin credentials if you want to use the administrative cmdlets later, like changing the password expiration policy.
Change the user principal password expiration policy
Once logged in, we can just change the password expiration policy for the user with this script:
# Gets the current policiy value
Get-MsolUser -UserPrincipalName «releasemanagement@mytenant.onmicrosoft.com» | select PasswordNeverExpires
# Changes the policy to never expire
Get-MsolUser -UserPrincipalName «releasemanagement@mytenant.onmicrosoft.com» | Set-MsolUser -PasswordNeverExpires $true
There is a good blog post about this at https://azure.microsoft.com/en-us/documentation/articles/active-directory-passwords-set-expiration-policy/
What happens with service principals? Passwords never expire?
Service principals works in a different way. When you create a service principal, you can specify the StartDate and EndDate for the security principal credential (by default, StartDate=Now; EndDate = Now + 1 Year). You can change the EndDate in a similar way (is not a boolean flag, you need to set the EndDate).
For more information, visit the MSDN article https://msdn.microsoft.com/en-us/library/dn194091.aspx
