TLP-Innova 2015: las sesiones de TenerifeDev que no te puedes perder

highres_435020085Como todos sabéis, la Tenerife LAN Party 2015 está a la vuelta de la esquina. En menos de dos semanas, del 14 al 19 de Julio, podremos comenzar a disfrutar en el Recinto Ferial de Santa Cruz de Tenerife de uno de los mayores eventos en España relacionados con los eSports por no decir nada de cómo ha ido creciendo año tras año la sección Summer-Con.

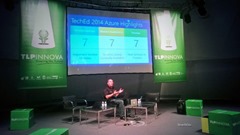
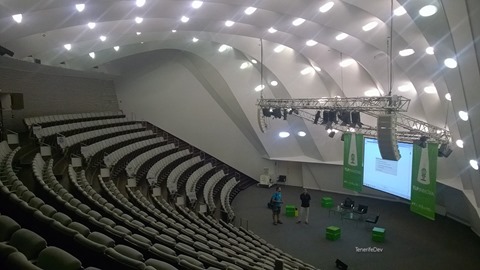
Otra de las áreas que también ha ido creciendo es el área profesional denominada TLP-Innova, que desde la edición anterior se celebra en el Auditorio de Tenerife Adán Martín, a pocos metros de la TLP ofreciendo un ambiente algo más formal y facilitando el desplazamiento de los asistentes entre uno y otro evento.

highres_435020106 highres_435020071

TenerifeDev, desde que comenzó su andadura hace 5 años atrás, no ha querido perderse este evento participando con charlas y talleres relacionados con tecnologías Microsoft, y este año nos hemos estado dejando la piel para poder ofrecer las mejores sesiones y talleres de la mano de los mejores cracks del mundillo. Por cierto, no te pierdas la entrevista a Santiago Porras para Conéctate al Día que tuvo lugar el pasado viernes 26 de junio (el programa completo lo podréis escuchar aquí).

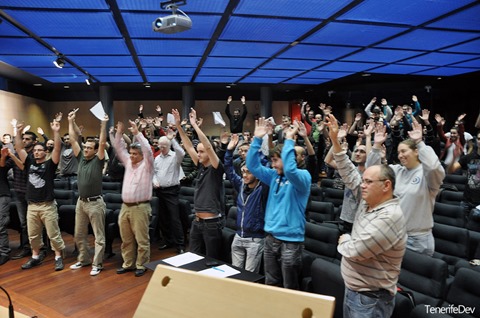
Microsoft is in da house! Everybody is in da house!

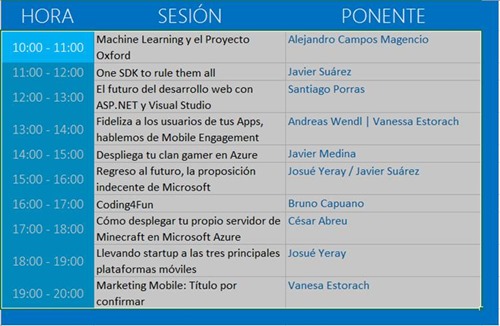
¿Qué sesiones y talleres? Si bien a través de la propia web de la TLP podréis acceder a una agenda que ahora mismo está en construcción, desde YA podéis ver en https://tlpinnova.eventday.com/ las sesiones que os estamos preparando desde TenerifeDev para el viernes 17 de Julio. Atentos a los talleres, actualización en breve para indicar el día, lugar y hora.

highres_435020069 highres_435020089

Dentro de estas sesiones podréis ver la cantidad de cracks que tenemos este año en cartel: Bruno Capuano, Josue Yeray Julián Ferreiro, Javier Suárez, Alberto Díaz, Santiago Porras, César Abreu, Javi Medina, Vanessa Estorach, Andreas Wendl, …y además, contamos con la presencia de su majestad don Alejandro Campos Magencio de Microsoft, con el que también pasamos un buen rato en el pasado Web & Cloud tour hace unos meses.

Y aparte de pasar un buen rato con los ponentes (aquí más de uno parece sacado del club de la comedia), pues qué mejor si además se va a hablar de temas tan variados, desde desarrollo de aplicaciones multiplataforma hasta los entresijos del Machine Learning y el Proyecto Oxford (sí, eso que usaste en https://how-old.net/ para vacilar a sobre la edad que aparentabas tener por una foto), sin dejar atrás temas de actualidad como monetización, engagement y el despliegue de servicios en Azure. Incluso hay alguna sesión para los más geeks como el despliegue de un servidor de Minecraft en la nube o cómo montar la web de una guild. Aunque para geek, la sesión de Coding4Fun de Bruno Capuano con la que todos acabaréis encantados.

highres_435020081

Importante: ¡¡regístrate!!

El tema importante: regístrate para el evento en este enlace:

https://tlpinnova.eventday.com/

Simplemente tenéis que pulsar el botón de la página principal y rellenar los campos solicitados. Esto nos facilitará la gestión de este y próximos eventos.


Por supuesto muchas gracias a los sponsors de estas sesiones, sin los que no sería posible el desarrollo de las mismas. Colaboran:


Encamina_250  intelequia  LogoDevsDNA

microsoft250

[Released] DNN Azure Active Directory provider

DNNADHi all! Since long time ago I was trying to implement an Azure Active Directory provider for DNN Platform, and you know what? This weekend I got time for it, mostly because a pull request brought to my attention a change on the platform (thanks to Evan Smith for it! https://github.com/dnnsoftware/Dnn.Platform/pull/250).

So after spending some time coding and configuring the applications on Azure, I have built the first release of a DNN Azure Authentication provider that I have made available at Github.

Download and Code:

https://github.com/davidjrh/dnn.azureadprovider

Here all the configuration and installation steps at glance.

DNN Azure Active Directory provider

The DNN Azure Active Directory Provider is an Authentication provider for DNN Platform that uses Azure Active Directory OAuth2 authentication to authenticate users.

alt text

alt text

alt text

Requirements:

Installation and configuration guide

The installation and configuration guide has two parts: one referred to the Azure Active Directory setup; and a second one where we install the authorization provider on our DNN deployment and setup the AD parameters we created before.

Following the guide before, you will give access to all your Azure AD users to register and sign-in into your DNN application. You can go later and harden your security settings like only allow to access the DNN Web Application to certain users on the Azure Management portal. Also note that depending on you have "Public" or "Private" user account registration on your DNN portal, you will need to approve the registered user before allowing him to access the site.

Azure Active Directory setup
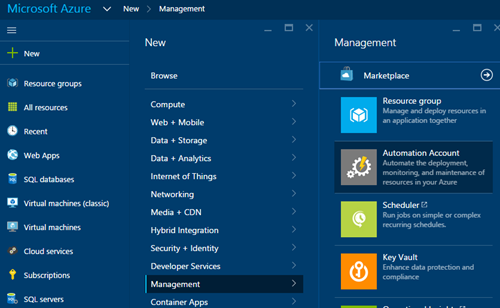
  1. Go to https://manage.windowsazure.com to setup the required applications on your Azure Active Directory. You need to use the user credentials of an user having at least "Service Admin" role.
  2. From the Azure Active Directory list, select the Directory you are going to setup
  3. Select the applications tab to create the two needed applications. On the scenario we are going to deploy we have a client application (the DNN web application) that will make requests to a Web API (the "resource" on the OAuth webflow). First of all we will setup the Web API app with permissions to read the AD, and then setup the second DNN Web app that has permissions to access the first app.
    1. Click on "Add" button from the bottom bar to start the application setup wizard
    2. Click on "Add an application my organization is developing"
    3. Set the "name" of your Web API application. This can be any name you want and is simply how you will identify the application in your Azure Active Directory (i.e. "My Contoso WebAPI").
    4. Set the type of application to "Web application and/or Web API" (notice that Web Applications and Web API’s are considered the same type of application as far as Azure AD is concerned), and click Next.
    5. Set the "Sign-on URL". This is the URL where users will access your application. There is no verification of this URL so even if the application hasn’t been developed yet the portal will still let you add it. (i.e. "https://mycontoso.com/login")
    6. Set the "App Id URI". Notice this is a URI and not a URL. This is what Azure AD will use to identify your application when authentication users requesting access to it. It can be practically anything you want as long as it is unique in your directory and a valid URI. (i.e. "https://mycontoso.com/mywebapi"). Click Finish to create the application.
    7. Ensure that on the "Configure" tab, under the "permissions to other applications", at least "Windows Azure Active Directory>Delegated Permissions>Enable sign-on and read users’ profiles" is checked.
  4. Now create the DNN Client Web App on Active Directory following the next steps:
    1. Again, from the "Applications" tab, click on "Add" button at the bottom bar to start the application setup wizard
    2. Click on "Add an application my organization is developing"
    3. Set the "name" of your Web API application. (i.e. "My Contoso Web App")
    4. Set the "Sign-on URL". (i.e. "https://mycontoso.com/login")
    5. Set the "App Id URI". (i.e. "https://mycontoso.com/mywebapp"). Click Finish to create the application.
    6. Now on the "Configure" tab, under the "keys" section, create a new key with the desired expiration (currently 1 or 2 years). Click on Save and then copy the key to a secure location. IMPORTANT: you won’t be able to copy this key later, so copy it now or generate a new one when needed.
    7. Under the "single sign-on" section, fill the "Reply URL" textbox with the REAL and valid URL you are using in your DNN portal. Note that you can specify more than one if you have different login pages. (i.e. https://azuread.dnndev.me/Login)
    8. Now let’s go and give permissions to the DNN Client Web App to access the Web API application we created before:
    9. Under the "permissions to other applications", click on the "Add Application" button
    10. On the "Show" dropdown list, select "All Apps" and then type on the "Starting with" textbox the name you specified when creating the Web API application (i.e. "My Contoso WebAPI"), and click on the search button
    11. Select the "My Contoso WebAPI" from the list below by clicking on the "+" icon and then click on the Finish button
    12. On the "My Contoso WebAPI" permissions row, check "Access MyContosoWebAPI" from the delegated permissions dropdown list.
    13. Click Save to finish.
DNN provider installation and configuration

It’s important to remember that you need a DNN deployment with version 7.4.1 or later to continue.

  1. Download the DNN Azure AD provider from the Releases folder (i.e. AzureADProvider_01.00.00_Install.resources)https://github.com/davidjrh/dnn.azureadprovider/tree/master/Releases
  2. Login into your DNN Platform website as a host user and install the provider from the "Host > Extensions" page
  3. Use the "Install Extension Wizard" to upload and install the file you downloaded on step 1. Once installed, you will see the auth provider listed under the "Authentication Systems" section.
  4. To setup the Azure AD provider for the current portal, go to "Admin > Extensions", and under the "Authentication Systems" click on the "Edit" module. A popup dialog opens to specify all the needed parameters:
    1. Go to the Azure Management portal, and selecting the My Contoso Web App, click on the "View Endpoints" on the bottom bar to view the app endpoints.alt text alt text
    2. TokenEndpoint: copy and paste the "OAuth 2.0 Token Endpoint"
    3. AuthorizationEndpoint: copy and paste the "OAuth 2.0 Authorization Endpoint"
    4. GraphEndpoint: copy and paste the "Windows Azure AD Graph API Endpoint" (this is not in use yet on this version, but will be used on new provider versions)
  5. Now fill the other fields:
    1. APIKey: from the DNN Web Application you created on Azure, copy and paste the Client ID field that s under the "Configuration" section
    2. APISecret: from the same DNN Web Application, copy and paste the key secret that you wrote down on a secure place. If you didn’t, you can generate another one, remember that are only shown once
    3. AppIdUri: copy and paste your WebAPI App ID Uri (IMPORTANT: this is not the WebApp ID Uri, is the WebAPI ID Uri you created before. On this example, ishttps://mycontoso.com/mywebapi). It’s the unique parameter you need to specify from the first WebAPI you created, all the other ones are from the DNN Web App application.
    4. Enable: check to enable the provider

alt text

References:

Global Azure Bootcamp: el evento que no debes perderte

MinionRace2015

Falta ya menos de una semana para el Global Azure Bootcamp 2015, el mayor evento global organizado por miembros de la comunidad: MVPs, Insiders, geeks y demás adictos al autoescalado y al Big Data. Se trata de la tercera edición de un evento que no hace más que crecer en cifras edición tras edición, con algunas que son para dejar la boca abierta, como los 27.000 servidores que se crearon en un solo día para participar en una investigación colaborativa para la detección temprana de la diabetes Tipo 2.

¿Cómo es el formato de este evento?

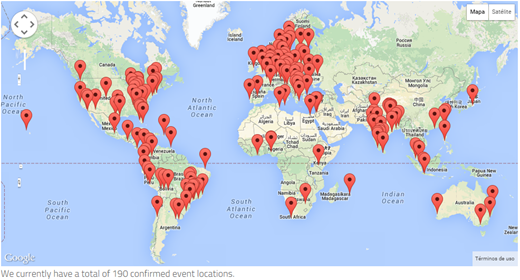
El evento se desarrollará durante el sábado 25 de Abril de 2015, en 190 localizaciones alrededor del globo. Desde hace algunos meses, el que tuviera ganas de participar en este evento global simplemente tenía que proponer su localización para montar una “sede” del evento, cumpliendo con algunos requerimientos mínimos para asegurar el éxito del evento: una sala acondicionada para la ocasión, agua, etc.

Como se puede observar en el mapa inferior, el evento al final tendrá una duración real de más de 24h al cubrir casi todos los usos horarios del planeta.

WorldWideLocations

Luego el formato dentro de cada localización podría adaptarse según la capacidad o intereses de los asistentes, yendo desde charlas técnicas a hands-on labs, pero sobretodo sintiendo que se forma parte de un evento global a través de un “Global Lab” en el que todos los asistentes de todas las ubicaciones participan a la vez, sacando a relucir lo que es capaz de ofrecer una plataforma de nube pública como Azure y obtener todo su jugo.

El Global Lab como eje central del evento

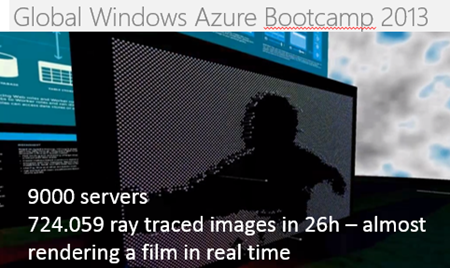
En el año 2013, en la primera edición del evento, este lab global consistía en el procesamiento y renderizado de imágenes a través de una super-granja de servidores: cada participante podía desplegar un Azure Cloud Service que descargaba los datos a procesar y una vez generada la imagen resultante la almacenaba en una ubicación temporal; otro proceso finalmente se encargaba de unir cada una de las imágenes para componer la película final.

El resultado en números fue espectacular: sobre 9.000 servidores desplegados en diversos centros de datos de Azure durante el mismo día, procesando alrededor de 725K imágenes, lo que casi viene a ser como generar una película de animación en tiempo real. 

2013GlobalLab

Si bien el resultado dejó bien claro la capacidad de la plataforma de Azure con esta prueba de concepto, en la edición de 2014 se quiso llegar algo más lejos y no desaprovechar la capacidad de procesamiento desplegada durante ese día, así que se optó por buscar algún campo de investigación real y que beneficiara finalmente a toda la humanidad.

Después de un proceso de selección entre varias investigaciones en curso alrededor del planeta, se llegó a la conclusión que una de las más interesantes era la investigación que estaba haciendo un Instituto de Investigación de California para la detección temprana de la diabetes Tipo 2. Los resultados de este trabajo no sólo ayudarían a entender el estado de la diabetes en humanos a nivel molecular sino que también redundarían en su detección en estados iniciales. Para más información sobre este lab, visita este enlace.

HF-and-Diabetes-Glycosylation-150.small_

El resultado de ese día: más de 27.000 servidores desplegados alrededor de 136 localizaciones a nivel global, procesando datos en un sólo día que equivalían a 3 años. Todo un avance del que todos pudimos salir orgullosos de haber puesto nuestro granito de arena en este esfuerzo titánico.

El Lab Global de 2015: dos por uno

Si bien esta participación en el lab global de ediciones anteriores, daba esa sensación de la globalidad e importancia del evento, en esta edición de 2015, se ha querido incrementar esa sensación de pertenencia al planeta Tierra escalando el número de labs globales a dos!

De este modo los asistentes al evento podrán participar, además de las otras actividades llevadas a cabo en cada sede (ver más abajo), en dos labs:

GlobalLab2015

  • Science Lab: de una forma muy similar al que se llevó a cabo en la edición anterior, se desarrollará una investigación global alrededor del cáncer de mama. Los asistentes al evento podrán desplegar máquinas virtuales en Azure para ayudar a analizar los datos necesarios para esta investigación, ayudando a conocer cómo la respuesta de la enfermedad es alterada basándose en las moléculas presentes en las células afectadas por el cáncer. Los resultados de este trabajo podrían llevar a nuevas terapias para atacar directamente diversas formas de cáncer con el mínimo de efectos colaterales. Puedes encontrar más detalles científicos sobre esta investigación en la web global del evento. 
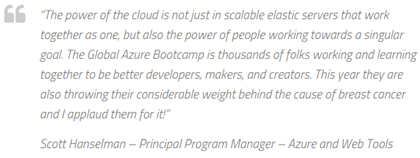
    HanselmanNote
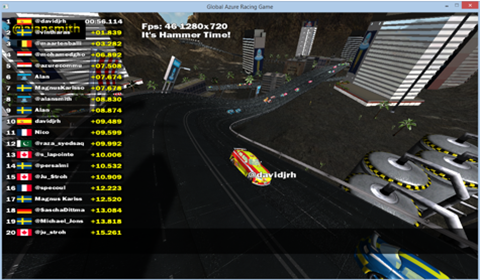
  • Racing Game Lab: el segundo de estos labs, y para añadir algo de diversión una vez que hemos echado a andar nuestros “minions” en el Science Lab, es sobre la participación activa en un juego de carreras en el que podrás poner a prueba tanto tus habilidades al volante como las de programación, ya que no sólo podrás divertirte consiguiendo logros como la vuelta rápida para tu país o picándote a entrar en el podio global, sino que también aprenderás cómo está implementado este juego en Azure explotando en tiempo real los datos de tiempos y telemetría de cada uno de los participantes. De hecho, se anima a que a cada 4 horas, todos participemos a la vez en el denominado “Hammer Time!”, para estresar y poner a prueba la capacidad de Azure con 10.000 jugadores a la vez alrededor del globo.
    Game3D

IMPORTANTE: Recuerda que si quieres participar en estos labs tienes que tener habilitada tu propia suscripción de Azure. Tienes disponible una prueba gratuita de 30 días que tiene 150€ de crédito que es ideal para el día del evento. Aunque no es obligatorio, llevar pre-instalado Visual Studio facilitará las tareas la parte de desarrollo del hands-on lab del Racing Game. Siempre quedará el Notepad.exe para los más valientes.

Crear prueba gratuita de Azure  de 30 días

Lo que te vas a encontrar en Madrid

Debido al rotundo éxito de la edición anterior, este año hemos tenido la cosa complicada para componer la agenda de entre más de 50 sesiones propuestas.

Finalmente, contaremos con 2 tracks (uno orientado a Dev y otro a IT) con 7 sesiones cada uno, más el tercer track sobre los Global Lab. En la preparación del desarrollo han participado de un modo u otro más de 30 profesionales del sector. Creo que en ninguna otra parte del globo se juntarán más de 20 MVPs con los que podrás aprender los últimos detalles de la plataforma Azure: Machine Learning, App Service, y mucho más!

Global Azure Bootcamp Madrid 2014

Ah! Y regalos para todos los asistentes!!!

Por supuesto, todo esto no sería posible sin la inestimable ayuda de nuestros patrocinadores, a los que agradecemos todo su esfuerzo e implicación en que este tipo de eventos, que recordemos que está siendo organizado por la comunidad, salga adelante.

LocalSponsors

Así que ya sabes, si aún no te has registrado al evento, no puedes dejar pasar esta oportunidad. Va a ser algo grande, muy grande, y queremos que formes parte.

Registro Global Azure Bootcamp 2015 – Madrid

P.D. ¿No he hablado de minions aún? ¡Pues te vas a hartar! Sonrisa

El Web & Cloud Tour pasa por Tenerife

WebCloudTour1

¡Muy buenas! ¿Sabías que Microsoft está preparando para finales de este mes de marzo una gira por toda España visitando varias comunidades técnicas en un evento de día completo? Un evento donde tendrás la posibilidad de conocer de primera mano las últimas novedades en desarrollo Web y Cloud de Microsoft. Aprenderás a desarrollar sitios web modernos, interactivos y rápidos con ASP.NET y Webtools de Visual Studio 2013 para después desplegarlos e implementarlos con Microsoft Azure. Descubrirás las nuevas características y los servicios que incluye como Microsoft Azure Virtual Machines, Websites y Visual Studio 2013 para construir y mover una gran variedad de aplicaciones al Cloud.

¡Esta jornada es un buen lugar para empezar a construir tu proyecto!

¿Cuándo?

En Tenerife, el evento será el miércoles 25 de marzo, tanto por la mañana como por la tarde. ¡Ojo, si quieres asistir a mañana y tarde debes registrarte a ambos eventos!

¿Dónde?

En el caso de Tenerife, el evento se desarrollará en el Aula Magna de la Facultad de Física de la Universidad de La Laguna

WebCloudTour2

¿Qué es lo que voy a aprender?

Este evento se compone de uno de mañana, relacionado a todo sobre la nube, y otro de tarde donde nos centraremos en el desarrollo web.

Horario – Sesión Cloud

09:00 – 09:30 – Registro

09:30 – 10:30 – Introducción a Microsoft Azure

10:30 – 11:30 – Soluciones PaaS con servicios en el Cloud y Azure WebSites

11:30 – 12:00 – Descanso

12:00 – 13:00 – Datos, SQL Azure y Azure Storage

13:00 – 14:00 – Gestión masiva de datos en la era IoT

Horario – Sesión Web

15:00 – 16:00 – Introducción a ASP.NET y Visual Studio Web Tooling

16:00 – 17:00 – Construyendo aplicaciones web con ASP.NET MVC

17:00 – 17:30 – Descanso

17:30 – 18:30 – Creación de API REST con WebAPI

18:30 – 19:30 – Aplicaciones en tiempo real con SignalR


¡Qué levante la mano quien quiera ir!

DSC_0107

Using the Azure Websites Migration Assistant to migrate a DNN website

Last October the Azure Websites team released a new tool to run the migration of local websites to Azure in a super-super-easy way: just following an assistant that analyzes and migrates your website to the cloud, including local database dependencies, all in a few clicks.

Using Apurva’s words:

Now you can easily migrate to Azure Websites from your existing websites that run on Internet Information Service (IIS) 6 or later. Azure Websites Migration Assistant can analyze your IIS server installation, identify which sites can be migrated to Azure Websites, highlight any elements that cannot be migrated or are unsupported on the platform, and then migrate your websites and associated databases to Azure with just a few clicks.

So what came immediately to my mind was if the assistant would work correctly when trying to migrate a DNN website to Azure and how would be the experience. Two months later, finally I got time to run a test, and has been amazing!!

Let’s summarize the steps to follow in the case you want to move your website as well. Check the Tips and Tricks section before running the assistant for lessons learned, so perhaps you can avoid to fall into some known errors. Note that this tool is also open source and the code is available at CodePlex, so fixes and improvements are welcome!


Moving your DNN site to the cloud in 3 steps

To start the process, you will need to browse https://www.movemetothecloud.net and follow the instructions. The migration process has 3 steps:

1. Install the Migration Assistant tool (available at https://www.movemetothecloud.net/)

2. Run the readiness assessment

3. Migrate your site(s) (hey! You can move more than one site at time!)

The website I used for this test was a DNN Platform 7.3.4 default installation. Before starting the assistant I double checked that the site was working fine (see tips and tricks section to save time on known issues).
clip_image002

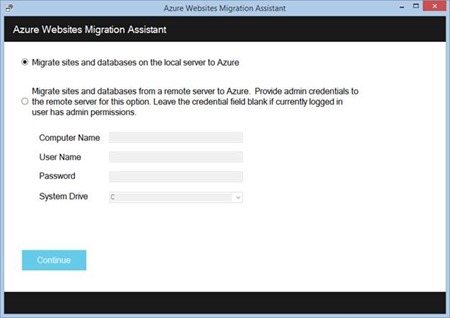
So after downloading the assistant the first screen appears to ask for the onpremise IIS server hosting the website to migrate. Since mine was my own laptop, I used the default option:
clip_image004

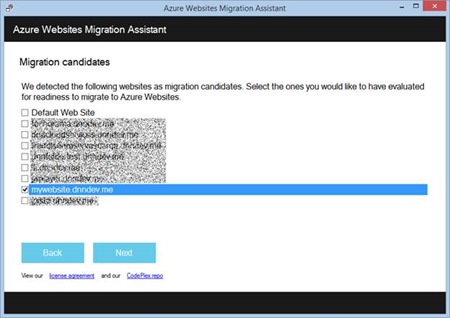
So after clicking next, the assistant contacts the IIS server and looks for possible candidates to migrate. I selected only the website I wanted to migrate unchecking all the others. You need to do it one by one, no unselect all option, but remember that you can contribute to the project!
clip_image006

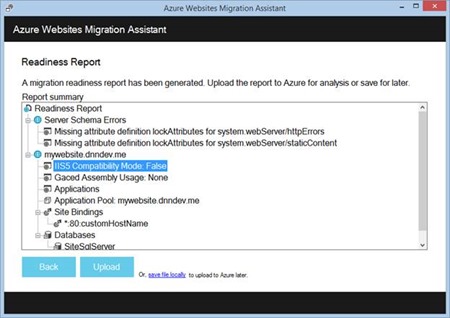
The next step shows a readiness report where the verification results are shown. My report was not showing anything scary so I simply continued with the following step by clicking on the Upload button.
clip_image008

And now started the cool part, because all the website provisioning, SQL Database server, database, etc. it’s automatically created during by the assistant just by clicking some buttons. This remembered me the DNN Azure Accelerator project that does the same but deploying on Azure by using the Cloud Services flavor.
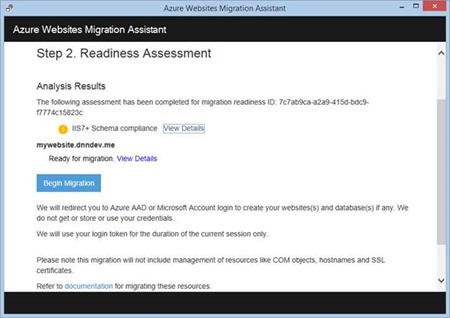
clip_image010

So when clicking on the “Begin Migration” button, the Azure AAD/Micosoft Account login page was shown to introduce my Azure subscription credentials:
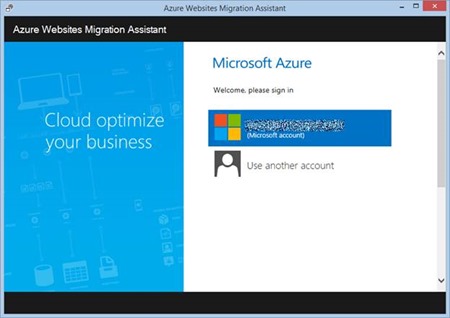
clip_image012

After signing in, I selected the subscription I wanted to use and the datacenter location. I’m not sure if there is a bug on the tool or the datacenter location is not fully populated with all the options, but I could only deploy on Central US, no other option appeared. As this was a migration test was OK for me, but I would need to revisit this in the future when migrating other websites so I can choose the desired datacenter location.
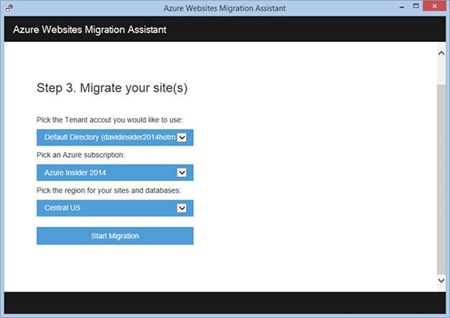
clip_image014

In the next step you can select the SQL Server settings, so can choose between an existent one or just create a new one what is the default option. I also left the database name setting as default as well, but I manually set the website name to avoid portal alias issues after deploying on Azure (check Tip #2 under the Tips and Tricks section at the end of the post).
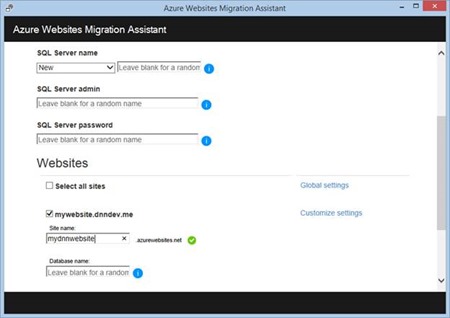
clip_image016

By clicking on the Customize settings link, you can also choose the website mode, the worker size, the web hosting plan (server farm) as well as the database edition. You can just use the defaults, but by my experience I would recommend at least a S1 database edition for performance reasons.
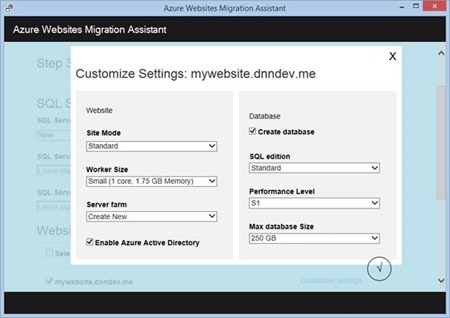
clip_image018

After clicking on the Create Website button, the migration process started by provisioning the needed resources, all smooth:
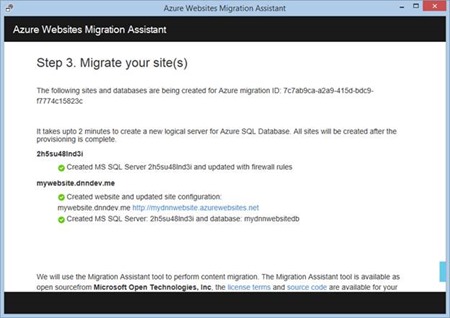
clip_image020

So once created, we start with the publish process by clicking on the Begin Publish button in order to start the website content upload as well as the database migration. By the logs being shown in this process and without confirming seeing the code at CodePlex, I suspect that this process is executed on two parallel threads, one uploading the content via webdeploy and the second by exporting/importing a .bacpac. It’s interesting because I’m very familiar running this type of migrations using just the same technique (note for myself: satisfy my curiosity spending a while reviewing the code at CodePlex).

Depending on the size of your site and the available bandwidth, this can take a long time. It is just a good moment for taking that cup of coffee.
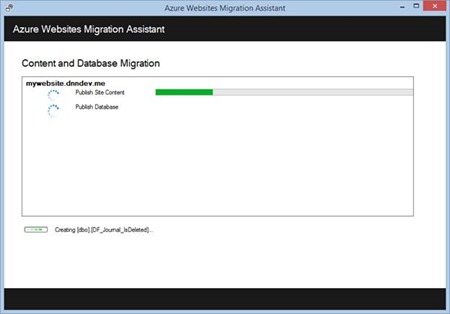
clip_image022

And just after the long wait, the site apparently finished without issues!
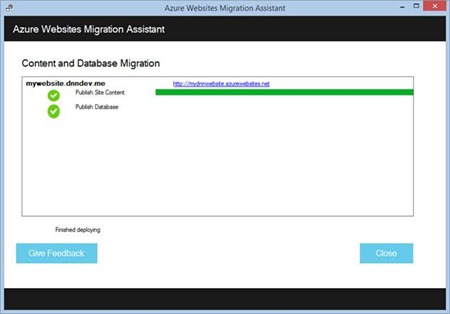
clip_image024

Browsing the Azure Website for the first time brought the website fully migrated to Azure. The assistant did the corresponding modifications in the web.config to target the new database (curiously, the change was done directly on the web.config file and not using the website connection string settings).
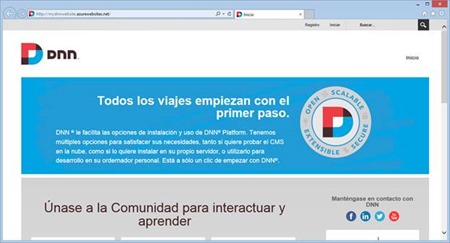
clip_image026

Who wants more?


Tips and tricks

Tip #1: check your local database for SQL Database incompatibilities

The wizard runs really smooth and it’s awesome to see it working just by specifying some settings, but be aware that the assistant has its limitations and probably does not analyze all what your website needs. The list of elements verified during the analysis are listed at http://azure.microsoft.com/en-us/documentation/articles/web-sites-migration-from-iis-server and while the checks done are awesome, seems that is not running any check on the database, so when I tried to migrate a website that I knew that had SQL Database incompatibility issues, the problem arose very late, just when all the website was migrated and the data was being inserted (this was after an hour of data transfer).

NOTE: SQL Database Update V12 (Preview) has been announced which provides nearly complete compatibility with the Microsoft SQL Server engine, so the mentioned below does not apply by the time you are reading this post.
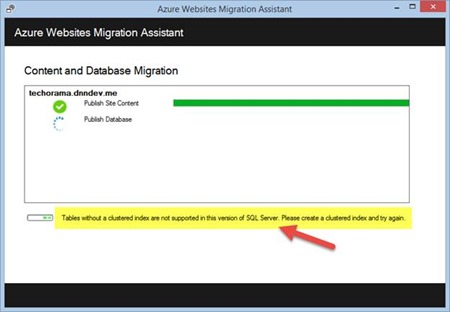
clip_image028

After a few minutes more the process stopped and gave a full error report, but no helpful info on the error or how to solve it.
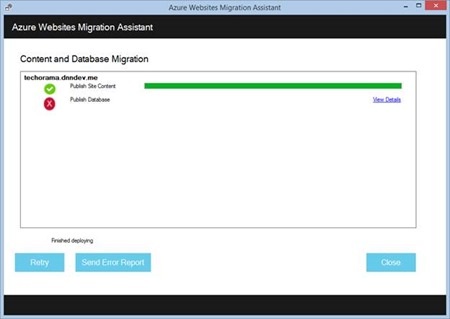
clip_image030

So before running the Azure Websites Migration assistant, if you are going to move a website that has a database dependency like DNN, I strongly recommend to you to verify that the database is SQL Database compatible. There are several ways to accomplish that objective, here some suggestions:

1) Use the SSMS database migration wizard targeting a SQL Database as destination. I believe a similar process is used under the covers (export/import a .bacpac), so the same errors appears without having to wait for the last step

2) Use the always free SQL Azure Migration wizard available at CodePlex (https://sqlazuremw.codeplex.com/)

3) Use RedGate’s SQL Compare, my favorite! Check here for a free trial (http://www.red-gate.com/products/sql-development/sql-compare/)

Tip #2: Adding a cloud portal alias before the migration

After migrating your DNN website to Azure you can get a 404 error if you have more than one portal in your local install or you have set the “Add Automatic Portal Alias” to false. I have wrote more info about the issue at https://serverfault.com/questions/655441/iis-website-works-on-only-one-port-in-localhost-settings/657915#657915

To avoid the issue, just add a portal alias BEFORE running the migration wizard, so it’s already configured when migrated to the cloud. If you are going to use a website name “MyDNNWebsite” on the wizard, just add the portal alias “MyDNNWebsite.azurewebsites.net”


Conclusions

Other problems can arise, but I have to say that for DNN projects the assistant works like a charm. Congratulations to the Azure Websites team for this jewel, I’m excited with the promised improvements coming in the future.

Hope this helps!

Redis Caching Provider for DNN Platform

redis-300dpiTwo months ago I promised a gift for the friends at the DNNCon, a new open sourced DNN caching provider based on Redis. Today, I’m pleased to announce that I have implemented a first version of the provider and tested it on both on-premise and Azure environments.

This caching provider allows you to use a Redis cache server/cluster within DNN Platform, using a hybrid in-memory approach to increase cache performance (items are cached in the local memory and on Redis cache), and the publisher/subscriber feature to keep in sync all the in-memory caches from the webfarm. You must use Redis 2.8.17 or higher for an on-premises deployment. The caching provider is also Azure Redis cache compatible.

If you want to contribute to the caching provider, just go to https://github.com/davidjrh/dnn.rediscachingprovider and clone the repository.


Quick Start

  1. Provision a Redis cache to be used by your DNN instance. Perhaps one of the fastest ways to do it is to provision an Azure Redis cache by following the steps described at http://msdn.microsoft.com/en-us/library/dn690516.aspx, remember to provision the DNN instance on the same datacenter location to improve performance. You can also provision your Redis cache on your premises by following instructions provided at http://redis.io/download. The caching provider has been tested with the Win64 Redis port. Note that the DNN Redis Caching provider supports working with a shared Redis cache deployment, so you can reuse the same Redis cache deployment on several DNN websites.
  2. Download from the https://github.com/davidjrh/dnn.rediscachingprovider/tree/master/Release folder the latest version of the DNN Redis Caching provider
  3. Using the Extensions page of your DNN instance, upload and install the Redis caching provider. Once installed, will be the default caching provider.
  4. Open your web.config file and specify the RedisCachingProvider connection string in the ConnectionStrings section. If you are using Azure Redis cache, your connection string should look like this:

<connectionStrings>

<add name="RedisCachingProvider" connectionString="mycache.redis.cache.windows.net,password={base64password},ssl=True" providerName="DotNetNuke.Providers.RedisCachingProvider" />

</connectionStrings>


Advanced configuration

There are some attributes you can use to tweak or debug the caching provider. The initial set of configurable attributes are:

  • keyPrefix (default string.Empty): this attribute is used to add a prefix to each key stored on the Redis cache. This can be used to share the Redis cache between different DNN deployments. When no prefix is specified (default empty string), the current DNN Host Guid will be used so by default, the cached keys are partitioned by the Host identifier.
  • useCompression (boolean, default false): before inserting on the Redis cache, the value is compressed in order to save memory. The values are deflated when retrieved from the Redis cache. While using this parameter can save resources on the Redis server has a performance penalty because of the compression operations
  • silentMode (boolean, default true): when the silent mode is set to true and an exception occurs, is logged on the DNN instance log files under "/Portals/_default/Logs" and not raising an exception. Note that the in-memory cache is used before the Redis cache, so the site normally will continue working, but can end in out of sync caches. Keep an eye on the log files to verify that everything is working fine.

Hope this helps. Happy coding, and happy new year!!

La hora del código: ASP.net vNext

imageLlegó la hora de cerrar los eventos que tenemos programados desde TenerifeDev para este año, y hemos hecho unos cambios de última hora para el evento de este jueves aprovechando  el evento global “La Hora del Código”. Para los que no sepáis de que va, es “un movimiento mundial, llegando a decenas de millones de estudiantes en más de 180 países. Cualquier persona, en cualquier lugar puede organizar un evento Hora de Código. No se necesita experiencia y está destinado para edades entre 4 y 104 años”.

Por este motivo, hemos cambiado la sesión sobre SharePoint por una más general de mayor audiencia de Introducción a ASP.net vNext, en el mismo sitio y misma hora. Esta sesión iba a ser impartida por Tiberiu Covaci (MVP de ASP.net), pero por razones de última hora hemos cambiado su sesión para principios del año que viene. En esta ocasión, Santiago Porras (MVP Windows Platform) y David Rodriguez (MVP Azure) serán los encargados de conducir la sesión.

Ir a la página de registro gratuito

  • Evento: Introducción a ASP.net vNext
  • Descripción: Ven y conoce de primera mano cómo será la próxima versión de ASP.net, qué cosas cambian, dónde quedan los WebForms, cómo funcionan los controladores y qué le ha pasado al web.config. Santiago Porras, MVP de Windows Platform (@saintwukong) y David Rodriguez, MVP de Azure (@davidjrh) nos harán un recorrido por cada una de las novedades de la nueva plataforma para aplicaciones web y cloud. ASP.net vNext (aka ASP.NET 5), es completamente Open Source y está disponible en GitHub. ASP.NET 5 está actualmente en Preview.
  • Dónde: Salón de Grados de la ETSII
  • Cuándo: Jueves 11 de diciembre a las 18:00 GMT+0
  • Registro: registro gratuito en Eventbrite

Nos vemos el jueves!!

TenerifeDev: eventos para cerrar el año

TenerifeDev250Hacía algo de tiempo, desde la LAN Party de verano, que desde TenerifeDev no hemos preparado ninguna sesión de esas que nos gustan, donde vamos a pasar una tarde compartiendo experiencias de desarrollo sobre tecnologías innovadoras.

Si aún no conoces nuestro grupo de usuarios, se trata de un grupo sin ánimo de lucro en el que  nos reunimos para compartir experiencias de desarrollo de software sobre tecnologías Microsoft, siendo nuestro punto de encuentro habitual la sala de Grados de la ETSII de San Cristóbal de La Laguna, Tenerife. Este año hemos estado algo liados y no nos hemos las veces que nos hubiera gustado, pero nos hemos puesto un  objetivo de reunirnos al menos una vez al mes con diversas temáticas de alto grado de interés tanto para los alumnos como para gente como nosotros, que seguimos en el ámbito del desarrollo de software de forma profesional, facilitando un punto de encuentro entre alumnos y empresas.


Próximos eventos

Después de hacer un hueco en la agenda, hemos conseguido cerrar las siguientes fechas y temáticas, para lo que resta de año:

  • 16 de Octubre de 18:00 a 19:30 – Introducción a Azure Websites y Responsive Design:
    no te pierdas de la mano de Santiago Porras (MVP en Windows Platform Development) y David Rodríguez (MVP en Microsoft Azure) una sesión de introducción al desarrollo sobre Azure Websites, viendo distintos aspectos como la creación del site, integración con GitHub y Visual Studio, copias de seguridad, así como la forma de implementar tus sitios web mediante un diseño responsivo que sea adapte a cualquier dispositivo. Como no, veremos algo de Windows 10 para abrir boca.
    Lugar: Aula de la FEULL, antigua torre de Químicas
  • 19 de Noviembre de 18:00 a 19:30 – Introducción a Azure Mobile Services y Aplicaciones Universales:
    no te pierdas de la mano de Santiago Porras (MVP en Windows Platform Development) y David Rodríguez (MVP en Microsoft Azure) una sesión de introducción al desarrollo de apps para dispositivos móviles, integrando notificaciones push, bases de datos en backend, uso de proveedores de identidad como Facebook o Twitter, y todo ello compartiendo código mediante la creación de aplicaciones universales, el nuevo modelo de desarrollo de apps multi-plataforma.
    Lugar: Salón de Grados de la ETSII
  • 11 de Diciembre de 18:00 a 19:30 – Desplegando SharePoint en la nube:
    no te pierdas de la mano de Alberto Díaz (MVP de SharePoint Server), una sesión sobre cómo desplegar una granja de servidores SharePoint sobre Microsoft Azure, con tips & tricks sobre rendimiento y manual de buenas prácticas, y todo en menos de 10 clicks.
    Lugar: Salón de Grados de la ETSII

TenerifeDev también eres tú

No olvides que tú también puedes dar una sesión y compartir tus inquietudes y tus experiencias. ¿Que te gustó lo que hiciste el fin de semana y quieres compartirlo? Adelante. ¿Que estás en un proyecto que crees que sería interesante para mostrarlo? ¡Todos queremos verlo!

Para ello es muy fácil, ponte en contacto con nosotros a través de cualquiera de los siguientes medios y lo organizamos sobre la marcha.

I got a new laptop: where is my Break key?

This post is in memoriam to those cool keyboard designers that happily remove keys from laptops, just because they run out of space or because they think that key is no longer being used, doing things more funny for IT guys that they don’t have anything to do but spend their time on looking how to change now from full screen mode while doing a Remote Desktop session.

Raiders of the lost key

I have to say that I am very happy with my DELL M3800 laptop, it’s a real black beast workstation (16GB RAM, two SSD disks, UHD touch screen with the weight, etc.) with a very low weight, only 1,88Kg, what it does ideal for having opened several Visual Studio sessions, some Hyper-V machines running and a lot of other tasks in background. Cool!

I normally have the laptop connected via USB 3.0 to the dock station so I normally use an external keyboard during working hours, and was yesterday while running my awesome Windows 10 Technical Preview using Hyper-V and went to full-screen mode and unpinned the top bar to hide the remote session options (wanted a more immersive experience). To go to full-screen mode I used the menu “Full-Screen” from the Hyper-V window, but when I tried to came back to my real desktop by using the “Ctrl+Alt+Break” key combination, where in the hell was my Break/Pause key?

Keyboard_Low_Res

DELL M3800 Keyboard Layout

And then, I discovered a world of frustrated DELL customers asking for the same thing. How this can happen? How can I solve this?

Solution

I’m going to post here the solution so you can use it as well, but I’m really writing this because I’m sure I will need to revisit this post in a near future after reinstalling my OS for whatever reason.

I first tried to use a simple PowerShell cmdlets by sending the keys combination, but this was not working because the keyboard hooks just sends the keys to the Guest OS, and not to the “hosting Hyper-V window”.

Then I tried to use AutoHotKey in my local session, and while it’s a highly recommended piece of software for other tasks, has the same problem than using PowerShell, the keys are not sent to the hosting Hyper-V process (there are some attempts of resolving it by looking for the process handle, but after spending some time on that path, anything worked).

I gave a try to On Screen Keyboard (run osk.exe in a command line), in both the host OS and the Guest OS, but had the same issue, didn’t work!

So the solution: remap a key in my keyboard. This comes from a DELL support forums thread but I’m going to complement the answer because the procedure explained there is not easy to follow and does not explain how to map whatever key you want. 

WARNING Serious problems might occur if you modify the registry incorrectly by using Registry Editor or by using another method. These problems might require that you reinstall the operating system. Modify the registry at your own risk.

Remapping a key by using Scancodes: the hard way

I noticed that I was never using the key “Insert” (must be a key that keyboard designers use a lot), so I decided to convert that key as my new “Break” key. To do this remap, you must to do some modifications in your registry and then logoff/login again into your profile (restarting the laptop also works, but the first method is faster).

To change a key for another, you must open your registry editor by running regedit.exe and finding the key HKEY_LOCAL_MACHINESYSTEMCurrentControlSetControlKeyboard Layout. There you can manually change the keyboard mappings but this is not an easy task since you will need to start wasting your time looking for the scancodes documentation:

image

If you want to go that path, I recommend you to visit this link with a good keyboard scancodes reference: http://www.win.tue.nl/~aeb/linux/kbd/scancodes-1.html

Remapping a key by using Scancodes: the easy way

I was getting a headache reading all these documentation and then found an awesome Open Source tool called Sharpkeys and available at CodePlex that allows you to do this task without diving into any keyboard code reference. So here the final steps I followed:

  1. Download and install SharpKeys from CodePlex
  2. Run the app and click on the “Add” button to add a new key mapping
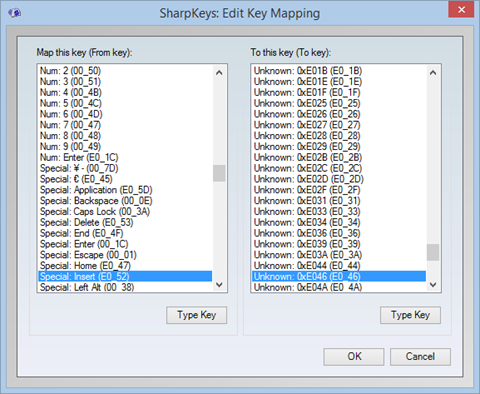
  3. From the left list, select the key you want to map in your keyboard (I used “Insert”). You can easily find another one by clicking on the “Type Key” button
  4. From the right list, select the key you want to target. In our case, and for the purpose of this post in pro of a human race with happy IT guys, we are going to specify “Unknown: 0xE046”, that is the Scancode for the <Pause/Break> key
  5. Click on OK and that will save the entry in your registry
  6. Logoff and logon again, and you will see now that by using <Ctrl>+<Alt>+<Insert> is now working as <Ctrl>+<Alt>+<Break>

image

Remapping a key by using Scancodes: the faster way

I have exported the registry key so if you want to use just the same mapping, changing the “Insert” key for the “Break” key without doing anything else, just download this file and open it to import it into your registry.

Hope this helps!

Solving OneDrive for Business 2013 synchronization issues

If you are reading this is probably because you have suffered synchronization issues while using OneDrive for Business 2013 to sync a SharePoint document library to your local file system, something really useful to work with offline files while disconnected from the network and allowing the utility to sync when coming online.

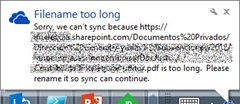
Which type of issues? Well, sounds bad, but one of the worst things I have experienced is that if a problem occurs when the sync starts, no sync is done at all, getting a popup window telling that somebody in your organization used, for example, a long file path. If OneDrive for Business founds something like this issue, it simply stops, does not continue with the other files. Bad.

FileNameTooLong

So you go to the document library, and trying to figure out the full path that the bubble is omitting, you change the file name or folder to shorten it and solve the issue…and then another popup, and other, until you have solved all these issues. No way of knowing all the possible issues to fix them at the same time.

And solving all the issues can be a hard task, if you see the sync restrictions available at http://support.microsoft.com/kb/2933738, from long path names to illegal characters and well… files of 2GB in size (who is storing 2GB files on SharePoint Online? BTW, who is storing 1,9GB files on SharePoint Online?)

Anyway, I was tired of following this procedure to solve the items one by one and decided to build a PowerShell script to analyse the document library structure returning all the conflictive files in a single operation.

PowerShell to the rescue

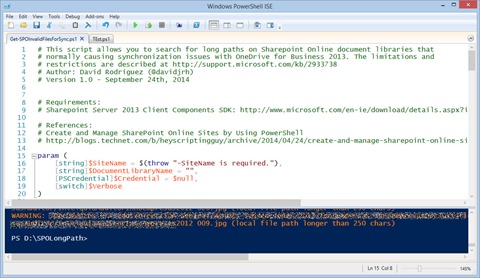
I have built a PowerShell script available at https://github.com/davidjrh/o365tools/ that uses the SharePoint Server 2013 Client SDK assemblies to connect to a SharePoint Online site and start doing the analysis. You can specify a document library or let the cmdlet to look all the document libraries in the site. You can pass the credentials as a PSCredential parameter or introduce them in a secure popup window when requested. Also enabling the Verbose switch will show the full progress of the analyzed files.

.Get-SPOInvalidFilesForSync.ps1 -SiteName "https://mytenant.sharepoint.com" 
                                 -DocumentLibraryName "My Documents" 
                                 -Credential $credentials 
                                 -Verbose

-SiteName The SharePoint Online site’s URL. Ensure to specify https

-DocumentLibraryName Optional. The name of the library to process

-Credential Optional. The credentials to be used to connect to SharePoint Online. If omitted, the script will pop up for input

-Verbose Optional. If specified, all verbose messages will be shown

PowerShellIseResult

Now you can go and customize this script and, for example, send an e-mail to the owner of that file asking for renaming it to fix the issue. Running this in an scheduled task is what I’ve finally do it.

Conclusion

SharePoint is good and OneDrive for Business is not bad. But PowerShell rulez.